Showing posts with label kitchen. Show all posts

Thursday, April 5, 2012

Another Chalkboard Paint Project

It's probably a good thing that I waited until recently to buy a can of chalkboard spray paint...otherwise my entire house might be covered with the stuff.

In case you missed it, a couple weeks ago I did THIS project. And today, while Ryne was napping, I did this!! (again, sorry for the crappy pics...camera is still at school...)
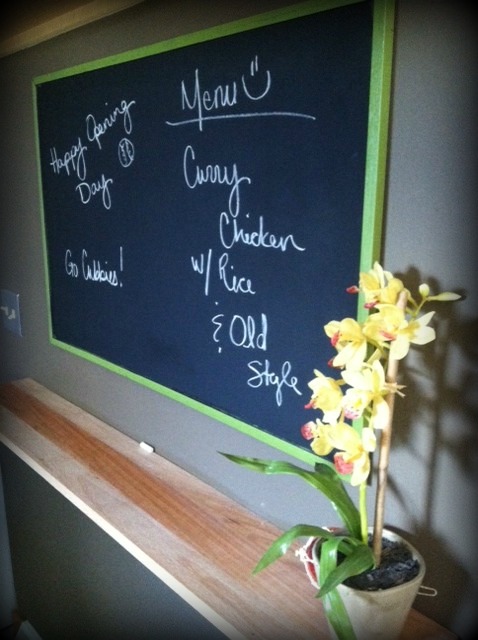
 

For months I've been trying to figure out a way to incorporate a menu/notes board into our kitchen, but I'm working with such limited wall space, that finding a spot has been difficult. But on Monday, as I sat in our office, paying bills, and staring at the whiteboard hung on the wall that still had notes from last school year, I had an epiphany.


 That whiteboard (that my hubby brought home from work..i.e. FREE) shall be my new menu board and it shall go right here:


A while back I put up the shelf. Check out the post HERE.


To make my board, all I had to do was spray the chalkboard paint on, let it dry, tape off the chalkboard area and spray the frame green. Let it dry. Done. I'm so in love.


And speaking of Opening Day, a little Cubs love!


<3 dani

Tuesday, November 2, 2010

Duct Workin' It Out

A few weeks ago, I got rid of my counter top spice rack. As much as I love my current utensil holder, my plan was to find a larger one. Not only will this fill in the open space the spice rack left, but it would allow me to keep more utensils out and available. So far, I've had no luck finding a style or a price that suits me.

I made a quick pit stop at Menard's today to pick up a furnace filter and when I turned the corner, I saw this:


Okay, okay. I didn't see that, exactly, but I did see this:


and figured I could definitely turn a couple dollars of duct work into a kitchen utensil holder.

It's open on both ends and kinda sharp, so a little modification was in order.

I made a bottom by tracing a circle onto cardboard, cutting it out and gluing it on.


Clearly, keeping a clean edge wasn't important to me, but I can totally rationalize that. One, I didn't want the sharp edge to poke through and B) it's clear glue...


To be sure the bottom wasn't going to bust out the first time I mashed a spoon in there, I dribbled some glue on the inside too. Even prettier.

This is when I thought I was done. I took it upstairs and put my utensils in it...it was too tall. I couldn't see anything in it. So lame. Back downstairs I went.

I grabbed a pair of needle nose pliers and went to town, bending and curling. I was sure to turn in the sharp corners.


and here it is, before and after


p.s. - my fantastically creative ceramics BFA college roomie made all of the beautiful pottery you see in our house, including this piece. 


I'm going to keep searching, but for the time being, this industrial looking piece might work.

<3 dani

Monday, October 11, 2010

Fall is in the air...and all over our house

Even though it was 84 degrees outside today, it is still, most certainly, October 11th and well into the fall decorating season. I started decorating the very first day of October, but I haven't really stopped since. Considering we're hosting the Halloween Partay this year, I probably won't stop adding to it until Thanksgiving!


I went all autumn colors in the living room and all black and spooky in the kitchen/dining room. Right after the Halloween Partay, the autumn colors will take over until after Thanksgiving. 

Here's how I usually start a decorating project. Yeah, it may appear to be a pile of stuff, but it's so much more. We all have that shelf (or several, hell we might even have an entire storage room) full of extra decorating stuff. Before I got out and buy anything, I compile everything I have with the style I need. Color doesn't matter of course, cue the spray paint.


I don't necessarily use everything, nor do I limit myself from pulling from all over the house.  
before #1

before #2


annnd After


The foliage, ceramic pumpkins, and ribbon are all dollar store finds. The large candlestick and paper pumpkin are Goodwill treasures. The rest I had! [doin' the cheap-o dance right now!] The little candlestick used to live in my bedroom and in it's past life was bright blue. The candles are clearly recycled from my 'I got sick of that scent' candle bin. The big wooden vase thingy was a Pier 1 going out-of-business find. In total, I'd guess the entire mantle was under $20. Considering most of this stuff I already had and used, which obviously cancels it's cost, I spent $8! So sweet.


An old grapevine wreath, covered with black crepe paper and ribbon and a dollar store black bird. $1.


**Here's the updated and way cooler display.**

Craft scraps and a few Christmas decorations, along with a dollar store sparkle skull and a black charger and, Vuala! The candelabra was a half off find at Michael's a few years back. Not my best work, but I had to come up with something creepy to fill the space for now at least.


The beads, ribbon and balls in the bambo vase thingy are all Christmas decorations. I know, right? Black christmas stuff!? Totally. My hubby and I found it at the Hob Lob our very first Christmas in our house and we loaded up on it. It may seem odd, but I promise, it's be-u-ta-ful. The skull was a Michael's half off find and the skeleton jumped into my cart at the dollar store. 

I feel like the kitchen/dining room is sparse, but that stuff only has to last through the partaay, so I didn't spend too much time (or moola). 

I heart fall decor and have spent, maybe, $15 updating and adding on this year. When I make the change in the spooky room, I'll post more, babushkas!

<3 dani

LINKIN UP