Showing posts with label decor. Show all posts

Sunday, January 27, 2013

Living Room Update

Over the summer I found the perfect sofa, but making my perfect sofa work in my living room has been quite a long process, and just shy of remodeling, this is the biggest transformation this room could have.

Here's what I've created so far, but there's so much more to go.


On to the drawn out process.

After having Little Dude, I found myself spending a lot of time on the couch: breastfeeding, napping, eating. Everything happened on the couch. Turns out couches from discount furniture stores aren't exactly meant to live through 6 years of serious wear and tear. So, while sitting on my discount sofa I,  more often than not, ended up needing help pulling myself out of the couch's black hole of a seat. Furniture shopping here I come!

The search for a new sofa isn't easy. In fact, buying a car was easier than choosing a sofa, wth? So, when I finally found the couch I wanted, I realized I'd have to change everything about my living room's current decor. Totally worthy sacrifice for my sofa.

Here's what the fabric looks like in real-life.


First thing to go was wall color. There is such a thing as too much beige and I was crossing that line.

From this:

To this:


Which really looks like this.


I settled on this color after trying two others...yup two living room paintings

Next, the coffee table. A toddler and coffee table corners can only end badly. Not to mention our huge, gorgeous, thrift store table just didn't fit anymore. Padded corner ottoman here we come.


 Then, everything else was fair game. Take a peek...


The Hubs insisted we have a chair for this little spot near the fireplace...I wasn't sold on the idea thinking it might be too cramped, but this adorable, armless number fits perfectly. 

Cute little window cove.  Little Dude loves to play back here.


After several configurations and and many holes in the wall, I settle on this. I cut flowers with my silhouette (I cannot wait to share with you how friggin' awesome that machine is) on card stock and hung those in the  places that frames just didn't work.


The view from the dining room.


It's really come together. Now I'm waiting for: the perfect rug. That will help break up the beige a bit more; a couple more frames to hang near the lamp; someone to paint my trim white; and, a slimmer end table. Phew, looove.


Oh, and THIS is what it looked like before. Big Change, right?


And before I go, I apologize for the rough-around-the-edges photos. Little Dude snatched my camera from the cabinet and I've yet to find it. Hmm..

EDIT** I bought a new camera. It's amazing. So, most of the pictures you see (with the exception of the blurry ones) are from the new camera. Yippie!!

<3 dani

Wednesday, June 20, 2012

Front Door Update

This was such a quick, simple update. I was able to do it while the little one took a nap.


The Kid and I went to the store for one thing: a pool skimmer. We left with more, obviously. If I had enough self-control, I could walk right to the item I need without looking at anything and turn right around and leave. bing bang boom. But nope. Impossible. Whatever. I've accepted it. It's fine. Besides, I wanted to try out The Kid's new grocery cart cover. No point in making a quick trip if I'm going through the trouble of hooking him in, right?

Anyhow, as usual, I end up in the Clearance aisle and like any craft hoarder, I pick up everything going through all the crafty possibilities before I talk myself out of it and move on. Today though, I grabbed a Styrofoam wreath that was flat on one side and already covered with burlap for $3. Sold. But of course, you could grab a plan wreath at the ol' dollar store and cover it with whatever to get a similar product.

When The Kid went down for his nap, I ran to the kitchen, grabbed the coffee filters and threw together a new wreath.


I just kind of scrunched the filters up until they resembled flowers (if you squint your eyes).


Then I secured them to each other in small bunches with twist ties (no time to run to the basement for the glue gun).


Then I secured all the little bunches together as a big bunch.


And used several twist ties to wrap around the wreath and connect the filter flowers to it.


Yay. And all before The Kid woke up. Success.

<3 dani

Thursday, April 5, 2012

Another Chalkboard Paint Project

It's probably a good thing that I waited until recently to buy a can of chalkboard spray paint...otherwise my entire house might be covered with the stuff.

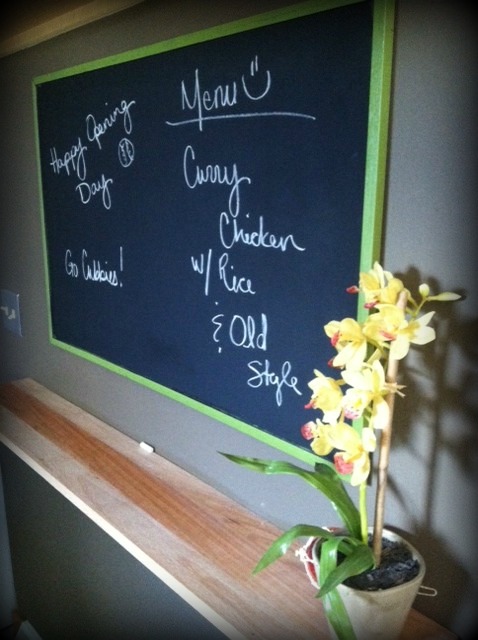
In case you missed it, a couple weeks ago I did THIS project. And today, while Ryne was napping, I did this!! (again, sorry for the crappy pics...camera is still at school...)
 

For months I've been trying to figure out a way to incorporate a menu/notes board into our kitchen, but I'm working with such limited wall space, that finding a spot has been difficult. But on Monday, as I sat in our office, paying bills, and staring at the whiteboard hung on the wall that still had notes from last school year, I had an epiphany.


 That whiteboard (that my hubby brought home from work..i.e. FREE) shall be my new menu board and it shall go right here:


A while back I put up the shelf. Check out the post HERE.


To make my board, all I had to do was spray the chalkboard paint on, let it dry, tape off the chalkboard area and spray the frame green. Let it dry. Done. I'm so in love.


And speaking of Opening Day, a little Cubs love!


<3 dani

Tuesday, April 3, 2012

Bottle Cap Art

This project, like many of my projects, was born out of necessity. Necessity to get rid of a piece of art that had seen better days.

I had framed a sprig of rosemary...not thinking that eventually it would dry out and all I would be left with was a twig...yeah, pretty in it's own right, but I could do better. 

Luckily, I hoard a couple of things. Bottle caps are one of those things. A couple of years ago I made THESE awesome coasters using bottle caps and since then I've continued to collect caps with the hopes that one day I'd make more (ps -- if I hit 100 followers by April 15th, I will hold a giveaway for a set of those marvelous things). But there are more caps than I need for more coasters, so I came up with another use.

Here is the new piece of coaster art: (sorry for the poor photos. I'm using my iphone because I forgot my camera at work and there's no way in hell I'm entering the school over spring break to retrieve it -- pretty sure that's against the law or something)


It was originally this:


All I did was rummage through my cap collection.


Organize the caps within the matte and hot glue them down.


Re-hang and boom, done.


If you like the "S", check out that project HERE


I dig it.

<3 dani

Wednesday, March 28, 2012

Simple Spring Mantle

It's nothing special. Just a simple change, but simple is good. One day I might drastically change it up, but I can't find anything to put up there that won't distract the beautiful wood.


Big fan of old books. They chill in almost every room of our house. They aren't in the bathroom, but I suppose that having them in there isn't such a terrible idea. Reading material...


Subtle colors. I loathe pastels, unless they are covering delicious candies. 


Of course some pottery from my ol' college buddy Lindsey Burns (the new owner of Bohemian Home in Plymouth, MI). 


I have a pretty sweet collection rocks. No really. I love rocks.

Happy Spring y'all.

<3 dani

Monday, March 26, 2012

Mobile Shmobile

Seriously? Mobiles are unbelievably, unnecessarily expensive. And is it possible for them to make one that matches my son's nursery theme? Noooo.

So, once again, we must improvise.


These poofies from momadvice.com inspired me. Of course, I'm not making mine pink. I already get in enough trouble when I make my son watch Clueless and sing Madonna. Heaven forbid he have pink poofies in his room ;-)  

My version:


Here's what I did. 

For the large poof, I took 10 sheets of tissue paper out of their package, unfolded them, then refolded accordion style. Be sure to crease your folds. --For the two small poofs, I cut 2 large sheets in half to make 4 smaller sheets (that's all I had -- oopsie -- a tad under prepared and over-excited).


Then, I wrapped and tied the middle with the ribbon I planned to hang it with. 


Next, I  separated each sheet from the other.


I forgot the rounding of the edges step on my big poof...yes, I was rushing.

After that, I carefully poofed each sheet. A few sheets were sacrificed by my hastiness.


And finally, I hung them above my little guy's changing table. Nice.

Yet another quick, inexpensive craft that you can even do half-assed and it still looks pretty neat. High-five.

<3 dani