Wednesday, November 10, 2010

Behind Schedule is Better Than No Schedule

Some 'good' news and some 'not-as-good' news...whatcha want first? The 'not-as-good' news it is then.

I am totally not keeping up with my blogging schedule. Here it is, November 10th and I only have five new posts. There's your 'not-as-good' news, folks. Maybe my goal was a little lofty, but I was trying to get at least five posts a week. I mean, I gotta keep ya comin' back somehow.

My crafty list keeps getting longer, but my free time keeps shrinking. For good reason though! [here's the 'good' news, in case you couldn't tell] So.........................I got a new teaching job! Yippie!! I am now the new Literacy Interventionist for 7th and 8th grade struggling readers and writers. I finally get my own classroom. I finally get to make my own lessons. I finally get freeeeeeeeeeedom with my students! It's going to be UH MAZE ING!

But, between preparing for the interview, freaking out, and all the other hiring process hoops I was jumping through (gladly jumping...more like leaping) my new blog has taken a back seat. So, I've decided that I need to adjust my blogging goal. Instead of five days a week, I think, at least for now, three is the magic number.

I love doing this and sharing ideas and hearing from other bloggers (that are insanely crafty) and there's no way I'll stop.

Nonetheless, I couldn't offer much inspiration this week, but I've gotten a lot from others. So here's to them!

If you haven't stopped by Mrs. Adventure, you are seriously missing out. This girl rocks it. Her Pine Cone Fire Starters are so clever.  I can't wait to make these for the holidays...hopefully I'll have some leftover for myself.


*dear sister-in-law, if you're reading this...STOP...NOW. love, me*

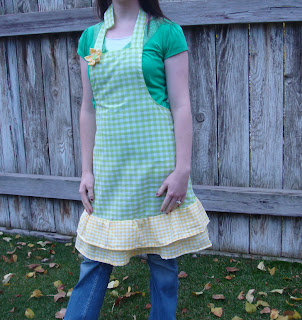
I've been looking for an easy, cute, inexpensive way to make my sissy-in-law an apron. She's a bake-a-holic and she'd look so stikin' cute working in the kitchen with a trendy little apron on. I was in luck this week when I saw Mychel's Easy Apron tutorial on Trendy Accentz. Not only did she create explanations that even a non-sewer (well non-traditional is more accurate) such as myself can understand, she made an amazingly stylish, inexpensive apron. Well done!

Like Chelsea at Crafter's Anonymous, I have been obsessed with scarves lately. Unfortunately, they ain't cheap! Unless, you do this. Her Infinity Scarf tutorial is so simple. I don't think that I'm confident enough to try the ruffle, but you might be ;-) I have a billion extra shirts just taking up space, who knew they could be this pretty?


Jennifer at MuseLodge couldn't help but start on her holiday decorations! And luckily for us, she shared her amazing idea. I love how her Christmas Advent Calendar...or Not (cute post title right) is not your average red and green glitzy holiday piece. Spend some time looking at all of Jennifer's blog, her style is refreshing.


Hope you like these ladies' super skills.

Have a happy end of your week and stay crafty, sistas!

<3 dani

*if you were featured, grab a button on my Featured page.

Sunday, November 7, 2010

Free Stuff Makes Me Happy

A few years ago, Allure Magazine compiled a list of the best 'freebie' websites. Being the cheap-o that I am, I went to all of them. But the one that has stuck around and remained free is the Silver Jewelry Club once known as freesilverjewelry.com.

They offer four different pieces for free at once. Every fifteen minutes or so a new piece goes up. If none of the available pieces spark your interest, find out what's coming up later and send yourself an email reminder. The only catch is that you have to wait for the right piece to become available. But that can be the exciting part too!

I've only ordered two pieces over the years, but could certainly have bought more. You have to pay the $6.99 S&H, but that's still cheaper than picking up a similar piece at a store.

Here are a few pieces that are available right now (or in the new future). Check 'em out. Who knows, you might find something you <3.


Canvas People are also offering up some free goodness! They are giving you $55 to spend towards ANY canvas you choose. The 8x10 Canvas is regulary $49 and you could get it free and only pay the $14.95 to have it shipped (sure that sounds steap, but put it in perspective...$15 personalized canvas). Such a super steal and an opportunity for a great holiday gift!

Photobucket


Do you know of any legit, amazing FREE websites?

Thursday, November 4, 2010

Trash Picking 101: The Oar

This beautiful thing


was once here


Yup, that's right...definitely my neighbors' trash can. 

In proper garbage picking fashion, I waltzed over there, shoeless and in my p.j.s, to grab it. You gotta be quick in this 'hood. Good stuff goes quickly!

There was so much potential in this rustic piece that I couldn't pass it up. With a bedroom redo underway, I was looking for artwork to fill the newly painted walls.

With a little cleaning up,


help from the Pup,


some white paint


and the perfect display spot


I got this and I'm so in love with the accidental beachy theme I created. The full bedroom reveal is coming soon, promise!


I know I'm not the only trash picker out there...right? Tell me about your best garbage find!

<3 dani


Plastic Pot Covers

This morning it was 34 degrees outside. Yesterday, it was colder. I guess that means it's time to take in my mums. I probably should have taken them in before Halloween (you'll agree when you see how pathetic they look), but they finished off the outside decor so nicely.

Bringing them inside created an issues because I have zero extra pots to put them in and turns out most stores stop selling planting pots when November hits. I can't have ugly black plastic pots inside my house! So, I came up with this:


See how sad those mums looks? In general, I don't have a green thumb. In fact, the way my plants die, it's like I don't have thumbs at all. I'm hoping that bringing these little guys inside will bring them back to life. As of this morning, they are looking better, but are still in plant ICU.

There wasn't much precision involved in this project (like usual) and I had to make sure not to cover the bottom drains.


I took some left over brown ribbon, some hot glue and brown packaging paper and went to town. Seriously, I just guessed how much paper I would need, cut it out and folded it down to make it fit perfectly (or as perfect as I get). Then glued it on, tied it off with ribbon and added a little piece of fall for decoration. It may not look as good as a new pot, but it definitely masks the unappealing black pots.


Now if only there was a craft to bring my plants back to life...sigh...any suggestions?

<3 dani

Tuesday, November 2, 2010

Duct Workin' It Out

A few weeks ago, I got rid of my counter top spice rack. As much as I love my current utensil holder, my plan was to find a larger one. Not only will this fill in the open space the spice rack left, but it would allow me to keep more utensils out and available. So far, I've had no luck finding a style or a price that suits me.

I made a quick pit stop at Menard's today to pick up a furnace filter and when I turned the corner, I saw this:


Okay, okay. I didn't see that, exactly, but I did see this:


and figured I could definitely turn a couple dollars of duct work into a kitchen utensil holder.

It's open on both ends and kinda sharp, so a little modification was in order.

I made a bottom by tracing a circle onto cardboard, cutting it out and gluing it on.


Clearly, keeping a clean edge wasn't important to me, but I can totally rationalize that. One, I didn't want the sharp edge to poke through and B) it's clear glue...


To be sure the bottom wasn't going to bust out the first time I mashed a spoon in there, I dribbled some glue on the inside too. Even prettier.

This is when I thought I was done. I took it upstairs and put my utensils in it...it was too tall. I couldn't see anything in it. So lame. Back downstairs I went.

I grabbed a pair of needle nose pliers and went to town, bending and curling. I was sure to turn in the sharp corners.


and here it is, before and after


p.s. - my fantastically creative ceramics BFA college roomie made all of the beautiful pottery you see in our house, including this piece. 


I'm going to keep searching, but for the time being, this industrial looking piece might work.

<3 dani

Monday, November 1, 2010

S.L.E.E.P. A Little Reminder

I'm slowly finishing our bedroom. Seriously, by the time I give you the full reveal, I'm sure all the bits and pieces I'm showing you will be shifted around the room. But you'll get the idea, smart little cookies.

Wall art lettering and I are getting along very well lately. The bathroom has a sign that says "BATH." The living room mantel has a big "S" on it. In the dining room hangs "Live, Laugh, Love." You see the trend, right?

I cannot leave the master bedroom out of the cool crowd, so here's what I did:


It started out as a different project than it ended. The ribbon wasn't ever part of the equation, but I found it at Salvation Army for like .50. I had always pictured it reading horizontally. Where I had originally wanted it to hang will now be the home to something I pulled from my neighbors garbage...(seriously...I'll post about that this week too), but here we sit and here it hangs -- above the dresser.

I used:

five letters from Hob Lob ($1ish each)
ribbon
craft paint
hot glue


Then I glued my letters on to my ribbon.


And hung it up.


Oops, I forgot to tell you about the little bow I put on the top. That was just extra ribbon smooshed into a shape that resembled a bow, held together with some hot glue. Nothing fancy.

The Hubs asked if I hung that "just in case we forget what to do in here?" Exactly, dear.

I'm still trying to decide if the ribbon works, or if the ribbon makes it look like it belongs in a child's bedroom. Whatcha think?

Tuesday, October 26, 2010

New Blogger Ketchup

or do I mean 'catch up'?

First let me just say that I have much love for all of you hardcore bloggers out there. I really thought I did my research before starting this blogette (that's what I call a baby blog) and I was fairly confident I had the right tools to facilitate all things bloggy.

wrong.

I had no idea about backgrounds or themes or dashboards.

Buttons? You mean the ones I pop off after a big dinner?

Linky Party? Seriously how do I get invited to one of these things!?

Features? Oh yeah, the Saturday night premiere movie on HBO. phew, knew that one.

Luckily, I'm a quick learner (and had a lot of time on my hands) and figured all those things out pretty quickly. In fact (speaking of features - toot toot), I've been featured two stinkin' times already. So awesome.

Bottle Cap Coasters


Book Page Wreath


At least I have the 'substance' part of this blog thing down. But there are still things I'm learning and, like usual, trying to do all on my own!

My blog header is one of those things. I've got it 'good enough' but that's just not good enough! It's pretty, but...well it's just pretty. It says nothing about this place. The wheels are still turnin'.

Another one of those things is my button. Even though I now know what a button is, I am still learning how to make one...that doesn't suck. I use the free program GIMP and for a n00b like me, it is totally not user friendly. I've come up with several buttons so far. One even ended up looking like someone else's out in blogland. A complete coincidence of course. I had never visited her site before, but that I definitely meant I had to fix mine, now!

So here's what I've come up with (for now):

Photobucket

It's still not good enough, but it's better than the last...ahem...four I've had. I know, four is a little crazy considering I haven't even been blogging for a month. But that just proves my point; my buttons are a little rough.

Slowly, but (almost) surely, I'm getting the hang of this. Bear with me, folks. Ima get this! (or Ima make one of my computer savvy friends do it for me!)

If you're a blogger, what were some of your unexpected issues when you first started blogging??

Coat Closet Clean Up

I like to think I'm a rather organized girl, but if I told you that standing in front of our coat closet you'd laugh -- at me, not with me. I realized this when I went for my gloves (yes, gloves. it's getting a little chilly in the midwest) and an avalanche of hats, scarves, purses, etcetera fell to the floor. Oops.

Here's how I made this:


Outta this:


As most of you know, my projects are always on an insanely low budget. And once again, here I am, trying to do an organization project on a budget of...wait for it...zero dollahs! Organizing caddies alone would send a better budget through the roof. But I came up with a free solution that proves (again) to the Hubs that I hold on to 'things' for a reason. What's the solution? you ask...Shoeboxes, of course. What?! Oh yeah.

True, initially they look a mess, but with a little help from some 'Oops Paint' and labels and those bad boys make a space like this:


Look like this:


What the!? Where the!? That's right, just one shelf folks. That heaping pile of hot mess condensed down to one, very organized shelf. Dang, it feels good to be [an organizing] ganster.

First, I threw everything on the floor. The Pup can't resist a pile of fluffy warm goodness.


Then I sorted it into piles and found homes for everything. My purses were taking up a lot of space that I needed on the lower shelf. So I made them a new home. For now, this is temporary. If I decide I love it, I'll get real hooks instead of nails.

I moved what I could of our seasonal items to the basement and purged the stuff we haven't used in over a year.

Not bad for free storage, right?!

So tell me, where does your organization fall a little short?

<3 dani

Sunday, October 24, 2010

Momma's Challenge: Cheap Ghost Wreath

The Momma bought some inexpensive ghost yard ornaments. They were inexpensive for a couple of reasons. Namely, when assembled they look like this:


Inexpensive or not, she couldn't put these up in her yard. She'd be laughed outta the neighborhood. So of course, she handed them off to me and said, "You want 'em? I mean, there's probably nothing you can do with them anyway. I'll just throw them out." Oh no she ditint! Reverse psychology definitely works on me. I took them and told her that comment was a challenge. I would definitely find something to do with these cheap ugly ghosts.

Here's what I came up with and what you'll need:

a few ghosts (you can use cheap ones from the store or make them from scratch)
black crepe paper
orange crepe paper
dollar store wreath
hot glue
black fabric scraps

I began by wrapping the DS wreath in black crepe paper. You could spray paint it black and skip this step, but I'm too cheap to buy more black spray paint.


I made up a few ugly ghosts and glued them on.

Wrapped it in scraps of black fabric.


Made and glued on some orange crepe paper flowers.


Better than the yard ornaments, yeah? High Five?!


So booyah, Momma! Challenge accepted! and won!

LINKIN' UP

Office Inspiration and Another 'Oops' Redesign

It's time to redesign our office. Not because it wasn't functional, but because I broke it. Yup, that's right. Tons of books scattered on the floor and a huge 'out-of-order' sign on the door. I'll get into details in just a sec, but first take a look at some of the photos that I'm using as inspiration for the redo.


Simple lines. Classic furniture. Clean, crisp colors. Loads of shelving. Now, I just have to figure out how to do this on a $30 budget...

On to the 'Oops' part of the story (I'm a good news first kinda girl).

Let me start by saying, I don't know what it is about cheap shelving and me, but we just don't get a long well. It's like, as soon as I get close to a cheap shelf, he freaks out, commits suicide and crumbles.

A few weeks ago, I demolished my craft area shelf by complete accident. If you missed that post, here it is. And Thursday, when I was still half-dying from my sinus infection, I got the urge to shift my bookshelf about four inches to center it on the wall. Guess what? I destroyed my bookshelf. Here's the carnage:


Note that I took all the books off the unit before attempting to move it and it stillll collapsed on me. Ugh.


Annnd left this nasty little hole in the wall.


It wasn't a total loss. Just as I did with the craft area cabinet, I took a hammer and made me some shelves. 

I wasn't really planning on redesigning the office, but I think the absence of a bookshelf certainly moved this project to the top of my list.

So, which inspiration photo do you love the most?


<3 dani