In 7th grade, my mom took me to JoAnn Fabrics to pick out material for my very first sewing project; an apron. Not my best work. I've made more aprons since then -- because, let's be honest, they are super simple -- but none as awesome as this one!
First, huge shout out to Mychel at
Trendy Accentz! She created
this easy-to-follow tutorial and is the reason I was able to create this pretty apron for my sis-in-law.
You'll need:
Scissors
Coordinating Thread (which I never have)
Sewing Machine
Iron
1 1/2 yards of Main Fabric
1 yard of Accent Fabric *(or more, read below)
Patience
I started by washing and drying and gently ironing my fabric. I know you might want to skip this part, but take it from me, you gotta' do it.
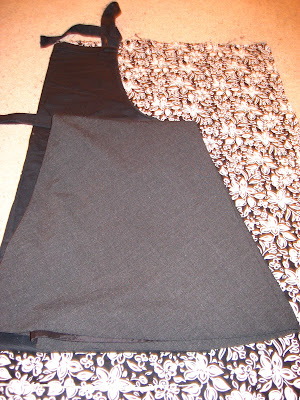
Then I folded my main fabric down the middle, laid it on the floor and put an actual apron over the top, also folded down the middle. This'll serve as your pattern.
Of course my plain Jane apron doesn't have the flair of my finished project, so I had to improvise. I grabbed an a-line skirt and added it to the mix.
I cut around all of this leaving a solid two inches for a
double hem.

Cut small slits, about 1/4 inch deep and 1 inch apart, in the curved edge of the fabric. These slits will help the curved edge of the fabric lie flat when you fold it. Thank you
eHow!
After cutting the apron out, I cut out the ties. Two for the neck, two for the waist. I only show two total here, but you'll need four. The neck ties are were about 2-3 inches wide (honestly, just eyeballed it) and the waist ties are about four inches wide.
Then I went straight to the ironing machine. Again, I know some of you want to skip this part, but I promise you this will save you effort in the end. I ironed a double hem (twice folded edges) so that my sewing would take less time (no pinning). Iron everything that will have a visible edge.
I sewed the hem around the entire apron, then I cinched and attached my ruffles.
Here's where my plan falters a little. *I should have purchased more accent fabric than I did. I could have made my ruffles along the bottom edge better if I had more length to work with. To make those cut little ruffles, I simply hand basted the top edge (the edge that will connect with the apron) and cinched the fabric up adding ruffles and being sure to keep the fabric long enough to still match the width of the apron. You can tell I wasn't too aware of this making my top ruffle. PS - if you need help with the ruffles go
here. Her tutorial is far more comprehensive than mine.
For the ties, all you have to do is fold the fabric in half, wrong sides together and sew down the open edges. Leave yourself a little bit of room to pull the fabric through to the right side. Attach them with a straight stitch.
Notice I'm not giving you a lot of measurements? That's because I didn't use any. I used my 'real' apron (i put real in quotes because it kinda suggests this new apron isn't real, but that's not the case at all) for guidance and I looked at
Mychel's pictures often too. As long as your edges look nice, you can make this little thing any way you'd like.
Here's the finished beauty. At one point I wished I wasn't giving this away!
<3 dani
Check out the creative places where I
LINK UP


So pretty! Great job on this apron!
ReplyDeleteSaw this on a link up. You make it look so easy. I'm bookmarking it for later. Thanks!
ReplyDeleteThis makes me wish I could sew. It is beautiful!
ReplyDeleteLove it! Thank you for linking up with Masterpiece Monday. Have a great week, Mary :O)
ReplyDeleteThanks for the apron tutorial. It looks great. I'm a follower now.
ReplyDeleteBtw, do you want to gain more blog followers? Then come on and join my "Swap Followings" Linky Party. This is an excellent opportunity for every blogger to meet other bloggers, follow them, and be followed in return. How does this work? Just simply "swap your following" which goes like this, "I follow your blog so please follow mine." All you have to do is create a post about the party, include the party button, follow 2 or more bloggers then leave them comments so they can follow you back.
The party has just begun so hop over to http://www.homemakeronadime.com/2011/01/swap-followings-linky-party-013111.html
Bring your best virtual smile, be prepared to meet great bloggers, and see you there! :)
i heart you!
ReplyDeleteI love this, such an easy project and I don't have to spend 20.00 on a pattern!
ReplyDeleteSo cute!! :)
ReplyDeleteWould love for you to come link up:
http://gigglesglitzandglam.blogspot.com/2011/01/tuesday-glam-party-13.html
So glad you linked this up!! :)
ReplyDeletethat is so adorable. i just love girl aprons.
ReplyDeleteJust to let you know, you were featured today on Simply Step Back!
ReplyDeletehttp://simplystepback.blogspot.com/2011/02/simply-share-it-party-3-features.html
Stop over and grab a button!
ummm...this ROCKS THE KASBAH!!
ReplyDeleteFor Realsies.
Like, you could sell them, infact, I think you should.
newest follower :)
I have to make one! Your's is adorable!
ReplyDeleteThank you so much for posting this! I think I might actually be able to make my own apron like I've been wanting to for ages!!! And way to go on the finished project-- it's adorable!!! :)
ReplyDelete